Whether you’re looking glue acrylic plastic for your next project or simply repair a break in your acrylic plastic, it’s important to know and understand the best method to glue plastics together for long-lasting results. Gluing acrylic plastics together is slightly trickier than gluing materials like ceramic, wood, or paper, and requires a different set of procedures. However, with a little know-how, you can successfully glue acrylic plastic to acrylic plastic like a professional.
Key Takeaways
- Gluing acrylic requires solvent-based adhesives, not standard super glue, to create a clear, strong chemical bond between surfaces.
- Super glue may work for small, opaque projects, but it dries cloudy and is not ideal for transparent or large acrylic pieces.
- Proper surface prep is critical. Clean, sanded, and aligned edges ensure a seamless and durable bond.
- Use a needle-tip applicator to apply solvent glue, allowing the adhesive to wick through joints without flooding or streaking.
- Allow 48 hours for full curing — a light bond forms in 15–30 minutes, but full strength requires a longer drying period.
Here’s what you need to know to glue acrylic to acrylic in this step-by-step guide.
Can I Use Super Glue to Glue Acrylic Plastics?
Well, the answer isn’t clear, or is it? Yes, you may be able to glue acrylic pieces together with super glue, however, this particular bonding agent or glue doesn’t dry clear. With its convenient needle tip applicator, the application process is easy; however, it’s in the drying where things begin to get cloudy – literally. Super glue is a superior bonding agent that works wonders on small projects or when working with opaque acrylic, where the dried glue is not visible or noticeable. It’s when it is used as a bonding agent in larger or utilizing transparent or clear acrylic where it makes a difference. That’s when the aesthetically pleasing answer is no, and the clear choice is solvent-based glues that form a permanent chemical bond that evaporates and dries clear.
Is it Gluing or Joining Acrylic Plastic Sheets?
Although it may be referred to as gluing acrylic plastics, the answer is surprisingly, both. A solvent-based glue is used to adhere acrylic pieces together; however, it is a chemical reaction that occurs that softens and weakens the acrylic surface that bonds the two surfaces together and permanently joins the two pieces together.
How Do I Glue Plastic to Plastic?
If you’ve ever tried to glue acrylic plastic together with standard glue, then you’ve already found out it doesn’t work or at the very least, it doesn’t work for long. The issue? Acrylic plastic can only be bonded with certain solvent-based glues. The solvent-based glue softens and weakens the surfaces of the two acrylic plastic pieces to form a chemical bond between the two surfaces. Once the two pieces are allowed to cure with the help and pressure of clamps or vices, the pieces will be permanently bonded.
Before working with any acrylic plastic, be sure safety protocols are in place.
Always work in a well-ventilated space when gluing acrylic plastics together with a solvent-based glue. Solvent-based adhesives release strong fumes. Whether it’s a small gluing or repair job or an ongoing project inhaling the fumes for a long period of time may cause lightheadedness, headaches, and other complications.
Use protective gear such as goggles, gloves, and a facemask as solvent-based glues can cause skin irritation, so keep it away from your eyes, mouth, and hands.
Gather all materials needed for the project at hand.
Let’s get started gluing acrylic plastic to acrylic plastic.
How to Glue Acrylic Plastic to Acrylic Plastic
Acrylic plastic is one of the most popular plastics used by consumers and businesses alike. It can be as crystal clear and transparent as glass, or dyed in various shades and tones. Regardless of project scope, gluing acrylic is simple with the correct procedures in place.
[wbcr_snippet id=”641″]
1. Set Up the Workspace
Make sure your workspace is well-ventilated. Next, ensure you’re gluing acrylic plastic pieces on a compatible surface. A table made from concrete, metal, or wood is ideal. Do not glue acrylic plastic on a table constructed of plastic, glass, or paper as the solvent-based glue being used in the project may cause the acrylic to attach to the surface. This can ruin the acrylic’s appearance or damage the table.
2. Prepare the Acrylic
Before gluing the acrylic pieces, ensure the materials are prepared for the project. Check the acrylic pieces for bumps, chips, or cuts. Any of these imperfections can compromise the integrity and strength of the bond, since acrylic glue does not easily sink into grooves or crevices, which would then leave gaps during the curing process.
For rough areas, use a router or light-grain sandpaper to even out acrylic edges – however, do not round the edges or make them too smooth, as this will compromise the strength of the bond. If possible, buy acrylic plastic with a saw-cut finish on the surfaces you wish to glue together.
Acrylic plastic should also undergo a basic cleaning and drying before gluing. Remove any dirt, dust, or oils that may have accumulated on the acrylic during handling or storage. Acrylic plastics should follow specific cleaning guidelines. Commercial cleansers like specially formulated product, Novus #1 offers a simple cleaning solution. Alternately, use lukewarm water, mild soap, and a soft cloth on the acrylic’s surface and area that you plan to glue together.
Next, position the acrylic plastic pieces in the exact positions you would like them to be glued. Then secure the acrylic plastic pieces using clamps, wooden blocks, or by having another person hold the acrylic firmly in place. Once the acrylic plastic pieces have been arranged to the desired configuration, it’s time to apply the solvent-based acrylic glue.
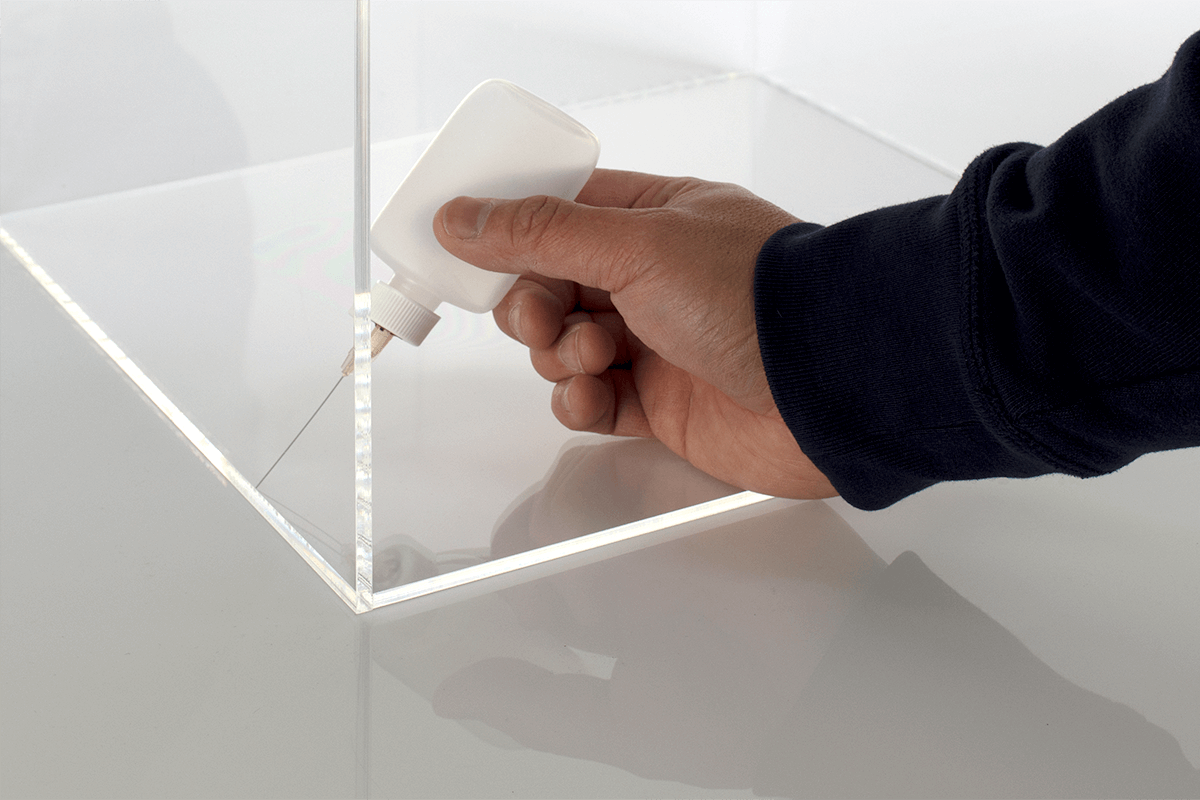
3. Apply the Glue
There are several types of solvent-based acrylic glue. For the purposes of this guide, we will focus on one of the most popular and trustworthy solvent-based acrylic glues on the market. This type of glue is made with a methylene chloride base.
If the adhesive isn’t already in the applicator bottle, then carefully transfer the acrylic glue to an applicator bottle (with a cap that is outfitted with a needle tip) using a funnel. A needle tip prevents excess glue from flooding the acrylic pieces. Once the bottle is filled to 75-percent capacity, stop filling with glue, and attach the cap. Gently squeeze the bottle to release the air inside.
Turn the glue-filled applicator bottle upside-down and place the needle tip in the farthest corner of the joined acrylic pieces. Then, lightly squeeze the bottle pulling it towards you, making sure that the adhesive is filling all seams and spaces as you move the bottle. The glue will be pulled into the joint and seams via what is known as capillarity, capillary action, capillary motion, or wicking. Move at a consistent pace in a continuous motion for a clean seamless look. Avoid starting and stopping part way through gluing to prevent an accumulation of glue and compromising the appearance. If this occurs and glue spills, floods or pools during the application, do not wipe it off immediately, rather let it dry. Wiping or applying pressure to an area with excess acrylic glue will permanently damage the acrylic. Instead, wait for the glue to evaporate, and clean the area, as necessary.
4. Allow the Adhesive to Set/Cure
Once the acrylic pieces have been glued together, hold it together for about 15 to 30 minutes (clamps may be used) but do not move. Soon after applying, you’ll notice the acrylic’s joined edges are cloudy white. As it dries, it will slowly become more transparent. Once 15 to 30 minutes have elapsed, you can stop holding the acrylic pieces together, as a light bond has already been formed between the acrylic pieces. However, do not put significant pressure on the joined acrylic piece until 48 hours have elapsed. While it only takes 15 minutes for the acrylic to create a light bond, a strong bond requires the acrylic solvent-glue to cure and completely dry.
Key Takeaways
When acrylic is glued together, a world of possibilities opens for its use cases. You can create retail displays, decorative boxes, models, and even fix cracks and breaks in existing acrylic structures. When the correct protocols are in place, it’s possible to seamlessly glue together acrylic plastic. Make sure to use the right type of glue for your project and follow the correct safety precautions.
Looking for acrylic plastic for your next project? Take a look at our wide selection of acrylic plastic products. Or, if you have additional questions, contact us today.
